Overview
overview.RmdOverview
The Virtual Bioequivalence (VBE) workflow in Pirana provides an integrated solution for conducting bioequivalence studies using the SimcypTM Simulator. This tutorial demonstrates how to use the VBE functionality to perform sensitivity analysis and population simulations through a user-friendly Shiny application orchestrated by the run management capabilities of the Pirana workbench.
Key Features
- Integrated Workflow: Seamless integration between Pirana and the SimcypTM Simulator via the Simcyp-R package
- Sensitivity Analysis: Comprehensive tools for parameter sensitivity assessment
- Population Simulations: Virtual population generation for bioequivalence studies
-
Shareable Projects: Self-contained
.vbeproject files for easy sharing and collaboration - Statistical Analysis: Built-in statistical tests for bioequivalence evaluation
Prerequisites
Note: Make sure you have completed Setup and Configuration before proceeding with this tutorial.
For detailed examples and step-by-step walkthroughs, visit the Paliperidone Example.
Creating a Simcyp VBE model
Step 1: Launch the Create VBE Dialog
- Navigate to the top-level menu in Pirana
- Select Models > New Model (or use the shortcut
Ctrl + n) - This will launch the ‘Create VBE’ dialog
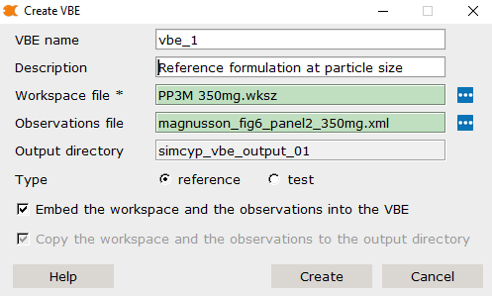
Step 2: Configure VBE Settings
VBE Name
- The default placeholder value is
vbe_1 - Additional VBEs will be indexed sequentially:
vbe_2,vbe_3,vbe_4, etc. - You can rename VBEs as needed, but it’s recommended to maintain default conventions
Description
- Use the “Description” field to add descriptive information about your VBE run
- This information is always editable in Pirana by right-clicking the VBE in the Pirana model table and selecting Notes and info
File Selection
-
Workspace File: Select your SimcypTM
workspace file (
.wksz) - e.g.,PP3M 350mg.wksz -
Observations File: Optionally select an
observations file (
.xml) - e.g.,magnusson_fig6_panel2_350mg.xml
Using the VBE Application
Understanding Critical Quality Attributes (CQAs)
Before running simulations, you should identify one or more Critical Quality Attributes (CQAs) that you intend to vary between reference and test formulations. These are parameters that may affect bioequivalence outcomes.
For the Paliperidone Palmitate example, the CQA is the mean radius value of a log-normal particle size distribution (PSD).
Phase 1: Generate Reference Group Results
Step 1: Set Reference Parameters
Start with the ‘reference’ group for initial simulations. For the
Paliperidone example, the reference particle size distribution value is
4.6357.
- Navigate to the Formulation Index section under Substrate > Absorption
- Set the parameter value for your CQA
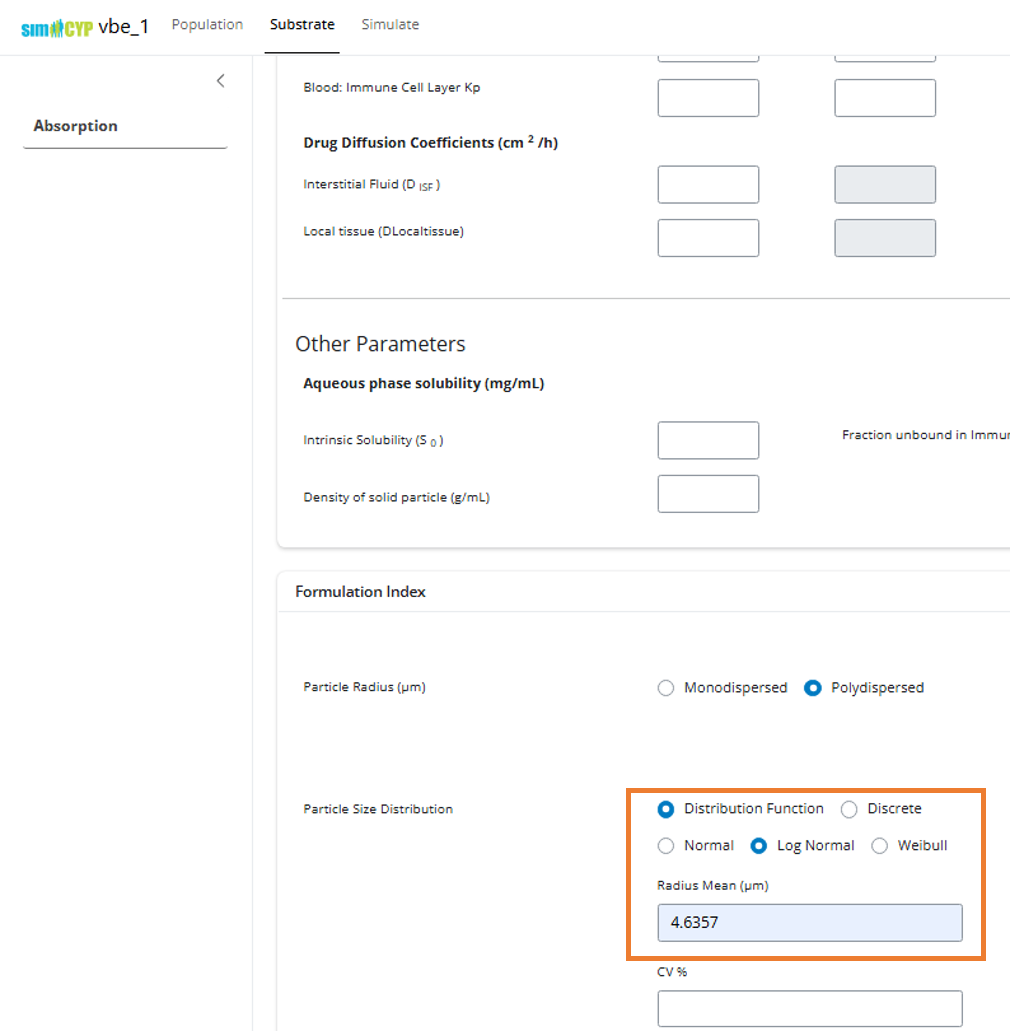
Note: For empty input values, the application will use the values
saved in the SimcypTM Simulator (.wksz)
file.
Step 2: Run the Simulation
- Navigate to the Simulate tab in the top menu
- Click the Simulate button in the left sidebar
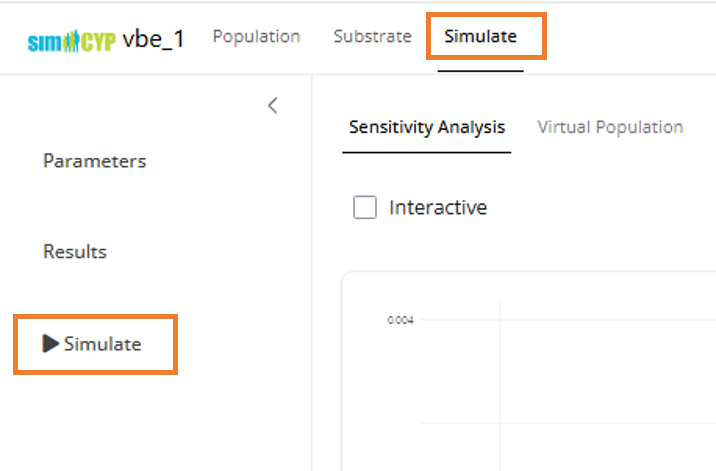
The ‘Run Simulation’ modal will appear with the following options:
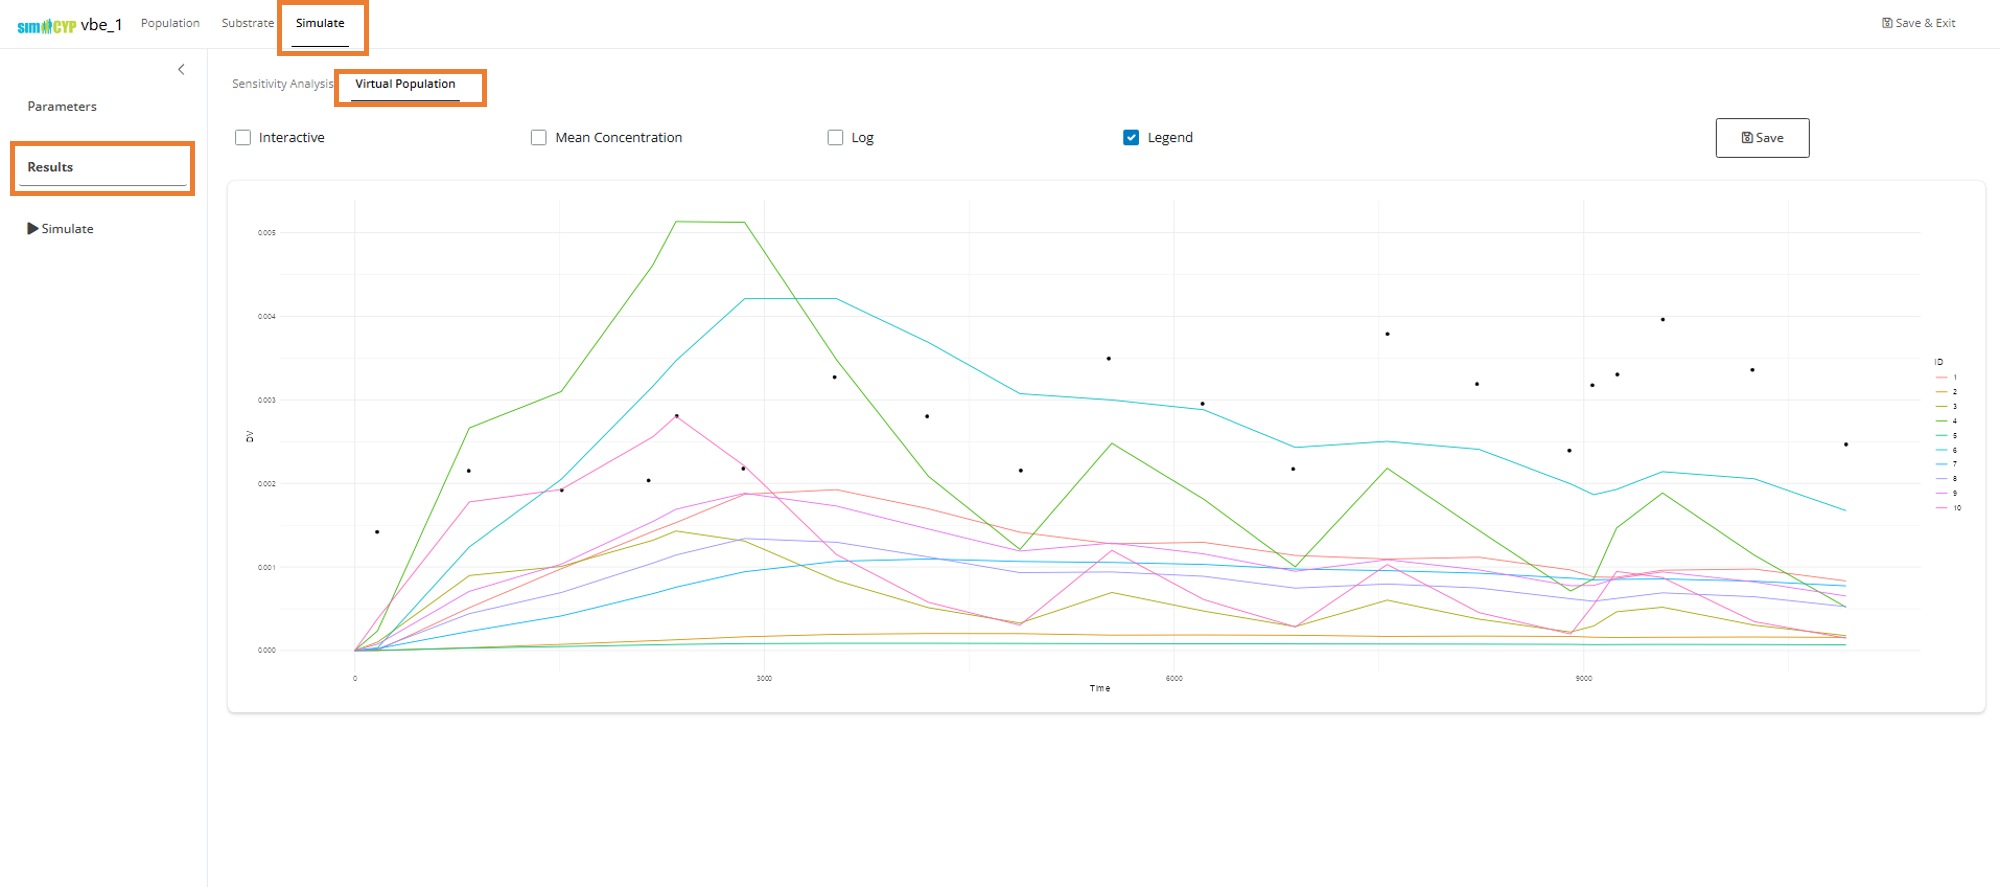
- Virtual Population: Select this radio button for population simulations
- Number of Subjects: Edit from the default value of 10 as needed
- Parallelize: Check this box for faster simulation, but note it will consume all available cores and may slow down other applications
- Parameter Table: Select a row in the parameter table to use the values for simulation
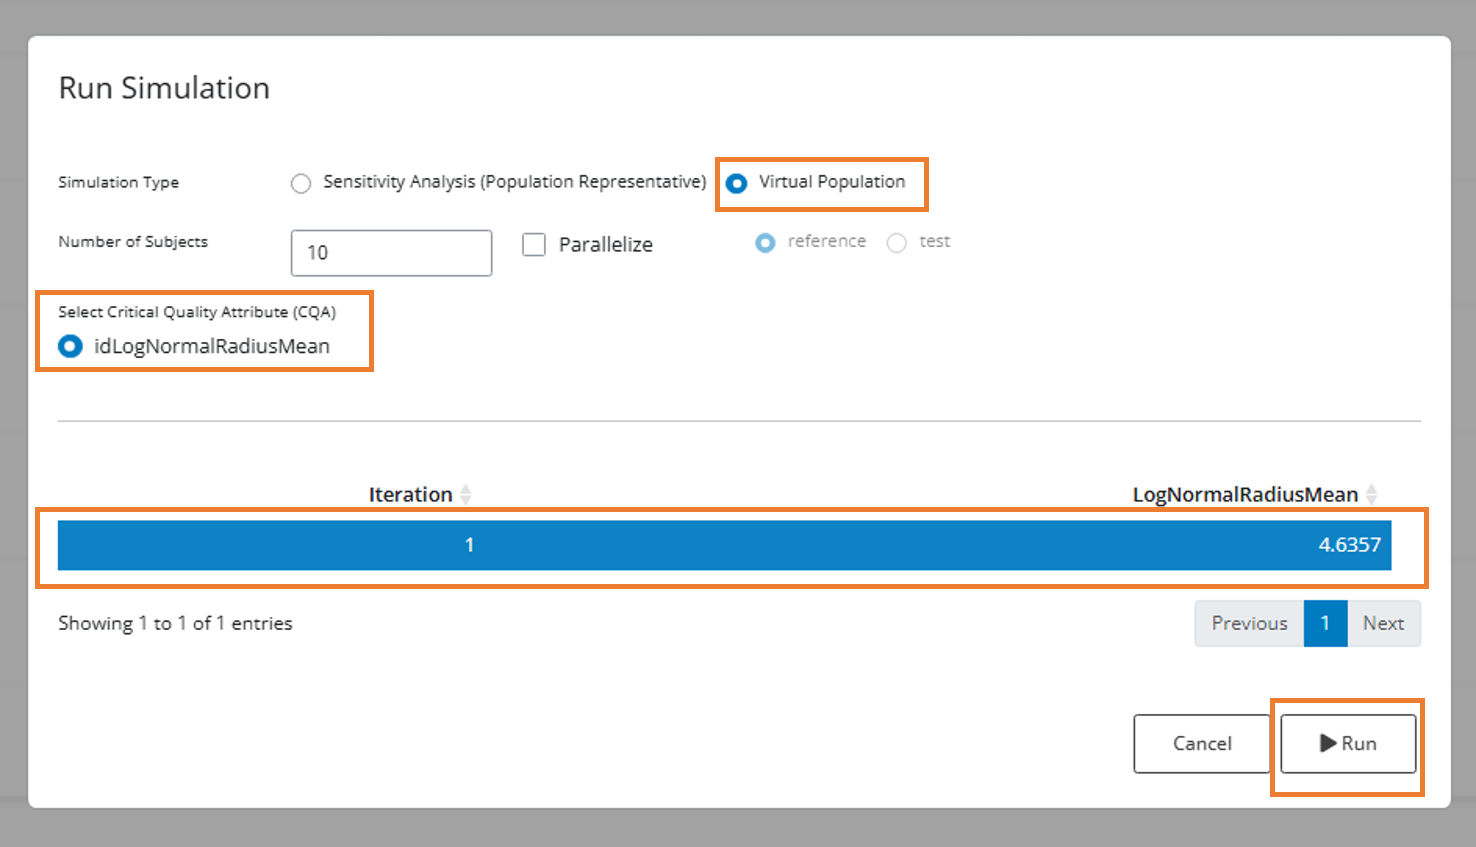
Note: In this example, there’s only one value for the CQA ‘LogNormalRadiusMean’ in the parameter table. However, you could enter multiple comma-separated values for sensitivity analysis (see Phase 2).
Phase 2: Perform Sensitivity Analysis
Step 1: Set Multiple Parameter Values
Return to the parameter input that you set for the reference group. For sensitivity analysis, you’ll want to test multiple values.
The application supports three input formats:
-
Single value:
4.6357 -
Comma-separated list:
2, 3, 4, 5, 6, 7 -
Sequence statement:
seq(1, 6, 0.5)(sequence from 1 to 6 by 0.5)
For this example, let’s test values around our reference value of
4.6357:

Step 2: Preview Parameter Combinations
Navigate to the Simulate tab and select Parameters. You’ll see an expanded grid showing all unique parameter combinations given the input values we’ve set:
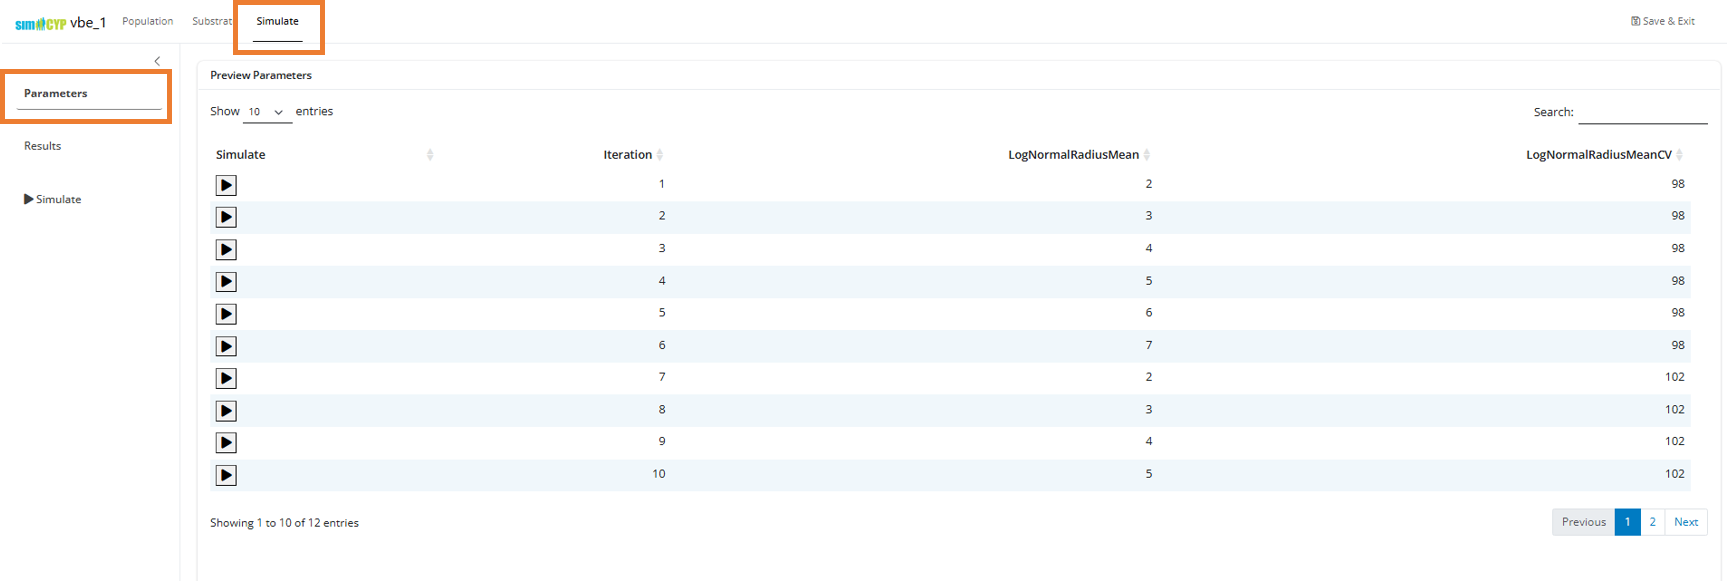
The iteration number corresponds to the unique identifier for each parameter combination.
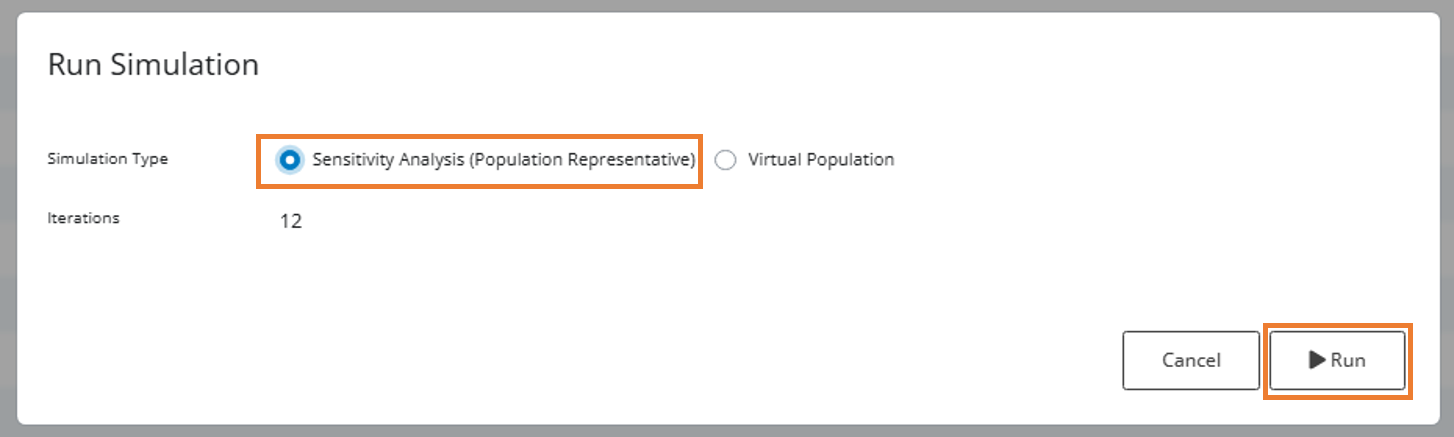
Step 3: Run Sensitivity Analysis
Instead of simulating individual parameter combinations, select the “Sensitivity Analysis (Population Representative)” radio button. This will perform simulations for a representative subject in the population for each unique parameter combination.
Step 4: Analyze Results
Navigate to the Results tab and select Sensitivity Analysis to view your sensitivity analysis results:
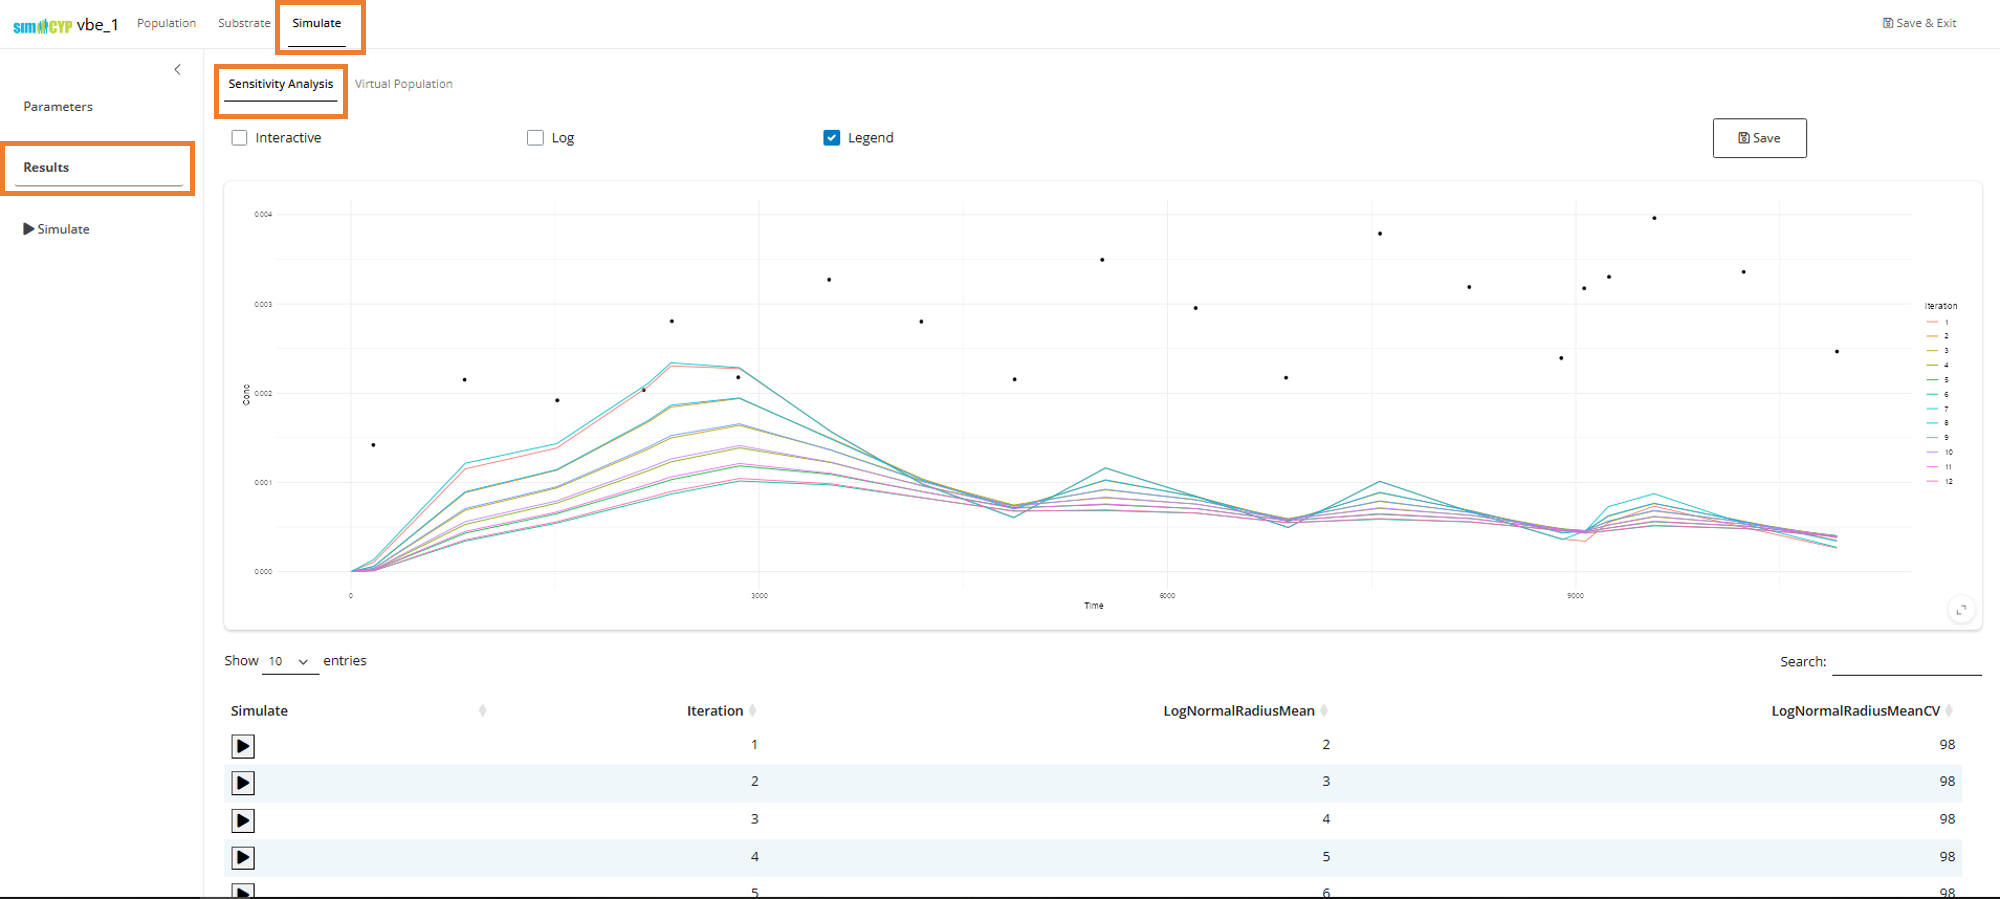
You can select any row in the table to observe the best fit through the data.
Note: Because the drug has very high variance and the distributions are log-normal, we’re seeing that the observed median value (points) is higher than the population representative predictions (lines) returned in the above sensitivity analysis plot.
Phase 3: Generate Test Group Results
Based on your sensitivity analysis, you can now identify the CQA values you want to test for bioequivalence. You will need to create a separate VBE for each test CQA value you want to evaluate.
This process is iterative. You don’t need to create all VBEs upfront. Instead, you typically:
- Start with a single test CQA value and simulate a certain number of subjects
- Run R scripts to compare test results against your reference
- Check bioequivalence statistics
- Adjust simulations as needed (increase subjects, modify parameters)
- Repeat the process until you achieve the desired statistical power
For example, if you have 15 CQA values to test, you might start with one CQA value, run simulations, analyze results, and then move to the next CQA value based on your findings.
Creating Test VBEs
For each test CQA value you want to evaluate:
- Create a new VBE using the same steps as for the reference group
e.g., using the same
.wksz - In the Create VBE dialog, select the ‘test’ option instead of ‘reference’
- Set the specific CQA value for this test formulation
- Run the virtual population simulation with the appropriate number of subjects
- Compare results with your reference group
Next Steps
After completing all phases, you can:
- Compare reference and test group results
- Perform statistical analysis for bioequivalence assessment
- Generate reports and visualizations
- Share your complete VBE project files.
In a real world VBE analysis, you will likely simulate thousands if not hundreds of thousands of subjects.
For detailed examples and advanced workflows, refer to the Paliperidone Example.